


A guest blog about the secrets of scintillating stars by Dan Bennett
Most of us know what stars are (“I always thought they were balls of gas burning billions of miles away” – Pumbaa), but how much do we know about twinkling, or, to give it its scientific term, scintillation? This blog piece may prove quite eye-opening, as you’ll end up by understanding scintillation in a whole new way. And – as a bonus – it will also describe what just might be the easiest type of astrophotography you can do.
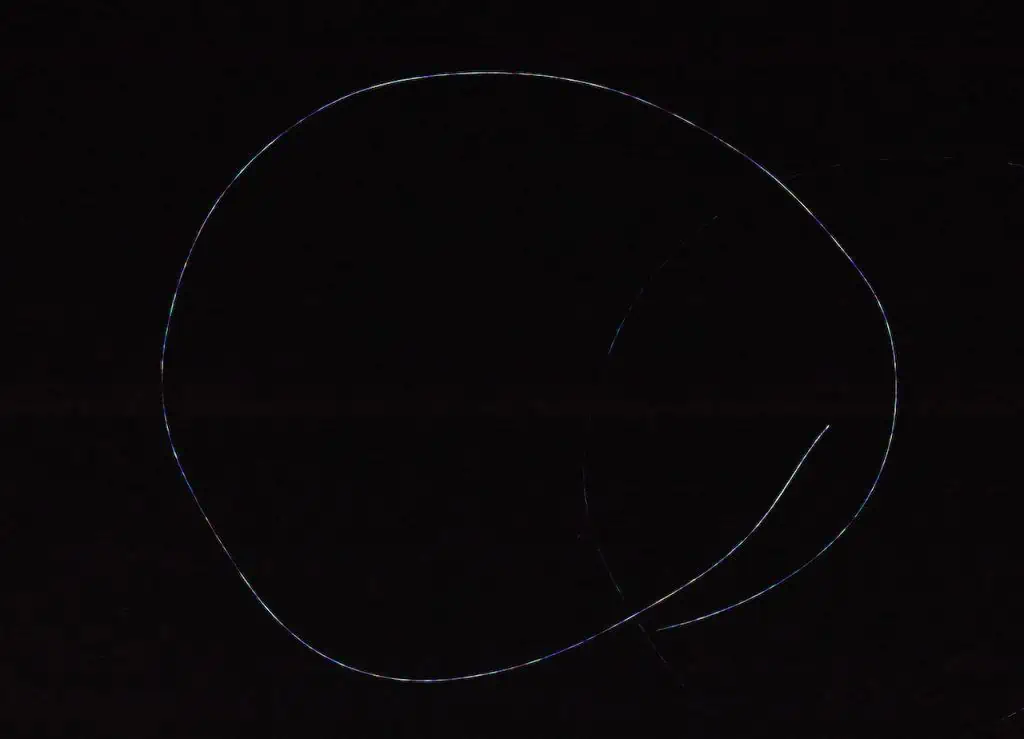
When you look at stars at night, they appear to fluctuate in brightness. The colour of the stars doesn’t appear to change; but you’ll see several variations in brightness every second. We know at a high level what’s causing this: it’s our atmosphere. Seen from the moon, the stars don’t twinkle. But it would probably surprise you to learn that rather than a few twinkles per second, the light from a star can actually undergo several hundred variations per second! And what’s more, these variations come in almost any colours you can think of! How can we tell? Look at the photograph I took of Sirius. (Click here for a high resolution version).
Yes, I know Sirius is a point of light and not a long squiggle in the sky. This photo wasn’t taken on an expensive equatorial telescope mount. Or even on a tripod, for that matter. In fact, the camera was hand-held and I deliberately swept it around in a circle when taking the photo! I’ll go into the technique a little deeper later in this piece; but first let’s consider the result of doing this.
What you can see in the photograph is the trace left by the light of Sirius as it swept across the camera’s sensor during a one second exposure. And boy, what a trace it is! You can think of it as a graph of brightness and colour over time, and as you can see, it’s anything but monochrome. Clearly, there are many more variations than just a few per second (remember, this is one second’s worth of light we’re looking at). In fact, I’ve gone to the trouble of counting all the variations along the trace (you’re welcome), and I came up with nearly 900! In other words, the light from Sirius that reaches the ground is changing approximately every millisecond!
When we observe twinkling with the naked eye, our eyes see only a fraction of the scintillation that’s going on. We see just a few large variations of white light per second. This is for several reasons: firstly, the eye can’t respond to changes in intensity that happen too quickly, so it essentially averages the light over time, which leads to us seeing only the coarsest variations in brightness; secondly, with all that averaging going on, any colours will add up to white; and finally, the light may be too dim to stimulate the cone cells in your retinas, so you wouldn’t see the colours anyway, since your rod cells only see in grayscale. If you really squint at the photo, you’ll see 6 or 7 areas that are brighter overall, which suggests that the unaided eye might have seen 6 or 7 twinkles during that second, which sounds about right.
OK, now we’ve understood what the photograph shows us, let’s use our imaginations to see what’s happening to the Sirius light as it reaches the ground. And… this is mind-blowing!
Imagine that the only light source in the sky is Sirius. There’s no moon, no other stars, no planets; just Sirius. If your eyes were somehow super-sensitive, what you’d see is a frantically moving network of ripples of coloured light running across the ground in all directions and overlapping. Some would be large and brighter, maybe even white; some would be tiny and strongly coloured. What are these? They’re called caustics, and they’re caused when light rays get bunched up by refraction. This is what you see at the bottom of a swimming pool or in shallow seawater in sunlight – take a look at the photo of the barracuda.

Imagine lying on your back on the sea floor: you’d see the sun’s image fluctuating dramatically in brightness as those caustics run over your face and travel across your eyes. Well, the same is true when you look at a star twinkling: instead of a pool, you’ve got the atmosphere; instead of a rippled water surface, you’ve got multiple layers of air with different densities, with ripples and turbulence running at those interfaces; and instead of the Sun, you’ve got Sirius. Quite literally, the whole landscape as far as you can see (in our imagined scenario) is covered in fast-flowing ripples of light from Sirius; and when you look at the star, you’re seeing those ripples as they run across your eyes. That’s twinkling!
So why are the variations in that photo of Sirius so strongly coloured? It’s the result of refraction, which is what’s causing the caustics. Refraction separates out the colours – just ask Isaac Newton when he’s got a prism in his hand. In fact, if you look at the barracuda photo again, you’ll see that the edges of the caustics are indeed coloured. They all have strong white centers, but this is because the Sun’s disk is quite wide in our sky. Sirius, however, is essentially a single point in the sky, which means that the caustics it casts are much thinner, and so the colours dominate.
Now let me initiate you into the secret of taking this particular type of stellar photo. It’s actually very easy, but it does require two things: a camera that can be operated in “manual” mode, and a moderately long lens – you need to be able to zoom in on the star. I took this photo of Sirius with a Canon EOS R camera equipped with a 70-200mm zoom lens set to 125mm. Set the exposure time to 1 second (or longer if you want longer squiggles), and the aperture can be moderately wide open (here, it was f/5.0).
The technique is to hand-hold the camera, and get a waggling or circular motion going that keeps the star in the viewfinder, then press the shutter button while continuing to move the camera. Of course, with a DSLR, the viewfinder goes black for the duration of the shot as the mirror’s lifted up, which means you can’t actually see the star while taking the shot, so it’s a bit hit-and-miss… so you take lots of shots. 🙂 Focusing may also be slightly challenging, but I found that my EOS R (which is mirrorless) autofocuses on the star perfectly. It’s a good idea to try to keep the speed of movement fairly constant during the shot as this will avoid bunching the trace, which would result in false bright/white patches. Oh, and turn off any stabilisation or you may get some strange results, such as octagonal traces.
For an easy technique that reveals the true nature of stellar scintillation, it’s pretty amazing, I’d say!
I have used the move-the-camera-while-shooting technique a lot; in fact I’ve written a book on the subject: A Field Guide to Time-Varying Light Sources (available on Amazon). The accompanying website is at timevaryinglights.com. Stellar scintillation is just one of the many fascinating light sources covered in the book.
I would encourage readers to take a camera to a dark sky site and experiment. Is there a difference between stars that are low to the horizon compared to those at the zenith? What about the planets – do they twinkle, and if so, when and how?
One of Tristan’s core messages is that there’s so much to see and learn if you only know where and how to look. I completely agree; and I’ve found that a very rewarding way to look involves waggling a camera.
You might also enjoy:
Time-Varying Light Sources (Dan’s website)
How to Forecast Weather with Twinkling Stars
How Navigate Naturally Using the Planets